Head, one of the main tennis racquet manufacturers in the world, is making a genuine effort to set itself apart from other manufacturers such as Babolat or Wilson. Head now gives you the ability to customize your own racquet on the website and (as Head says) feel like a pro on the court.
At first glimpse, it appears to be an awesome idea. Who wouldn’t want to own a racquet with all the bells and whistles. Novak Djokovic did a promo video for Head showing us just how easy it is to create your own racquet. He even get’s delivered the same day! The perks of being a star.
“Okay, Janet! This is going to be fun! It can’t be too difficult!”, that’s what was going through my head upon right after viewing this video. My enthusiasm didn’t stay at this level, I can tell you that much.
First Step: Design of the Racquet
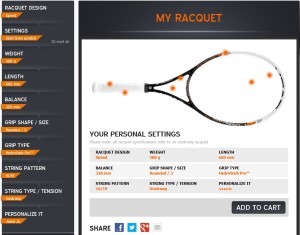
Well, first decision was definitely an easy one. I don’t want to have a black racquet, so I chose the only other option: “Speed”. It’s a mixture of white, black and orange (not necessarily my favorite colors, but pickers can’t be choosers right? But wait, isn’t that the point of this)
Second Step: Weight of the Racquet
I had to think twice about the weight. They give you some basic advice on how to determine the weight of your racquet. If you have great technique, go with a heavier racquet, as it predictably gives you more power. Whatever, I’ll just pick the weight I am playing with right now.
Third Step: Length of the Racquet
Again, they give you some nice advice but it all feels rather subjective. I still I wouldn’t know how the different lengths would affect my game until I get each one on the court with me. The standard length is 26.92 inches, which is what I picked. But again, I brought in my current racquet for guidance more than anything.
Fourth Step: Balance
Okay, now I am certainly at the point where I don’t have the knowledge to make an educated decision. Only a very savvy coach or proffessional would really be able to properly diagnose the difference between all the differences in balance..Guess, what I did? I looked at the stats of my current one, and chose 320 mm! Not really straying from what I know, I guess.
Fifth Step: Grip Size
Here we go, the grip size, that’s something I know. They again suggest a grip size for women (2) and men (3), what is usually really helpful. I realized when purchasing my last racquet that my fingers are too long for a standard womens grip, so I had to go with a size 3 over a size 2. It’s much more comfortable holding the racquet now with a grip curtailed to my needs. Success!
Sixth Step: Grip band
I have a favorite grip band color, and those three I can choose from are definitely not part of my favorites (I usually go with pink or green and obviously it takes my game to the next level). In order to get through this as fast as possible, I’ve chosen white and the Hydrosorb pro type. This ensures my hands won’t be all sweaty in my next match, especially in the Texas heat.
Seventh Step: String pattern
Weeeeeell, another decision I definitely didn’t really enjoy making. I was just so thankful to have my current racquet handy. I have now 16/19, so that’s what I chose for my custom one, too!
Eight Step: String type
I definitely leave this decision to the coach I trust the most. He certainly knows better than I do and can give me better advice than the website. So I just left the racquet of my dream “Unstrung”.
Ninth Step: Personalize The Racquet
That was fun and to be honest the best feature in this whole process. Hopefully “Janni Jo” will rock my next match!
All in all, it took me quite a while to go through all those steps and sometimes I just felt lost with all the information I had to provide on my future racquet. If you are really into the technology of racquets, this is probably for you. I personally think this whole process could be cool but it’s not quite the same as walking into a tennis shop and holding that racquet in your hand.
My Personalized Racquet
